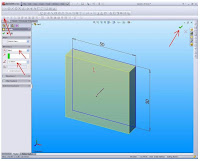
 We'll start making this 3D with more detail and complete again with the start of creating a new part.
Click the New button on the Standard toolbar.
New SolidWorks Document dialog box will appear.
Click Part.
Click OK
Next determine the plane
Determine the plane or the area that we want to make pictures ..... top, bottom, right or left
Next we create a sketch, for now we will make the box, then
Click Rectangle on the Sketch toolbar.
The Rectangle PropertyManager open in the left window.
Move the pointer in the workspace.
Click to place the starting point of the image.
Move the mouse and see a dynamic preview to follow the pointer.
Release the mouse and click on PropertyManager to complete the rectangle.
Now add the desired dimensions.
Click Smart Dimension on the Sketch toolbar.
Select the box that we are drawing.
Notice the preview box dimensions.
Move the pointer to where we want to give dimension and click to add dimension.
In the Modify box, click on the graph area.
Click Extrude 2D sketches to create 3D blocks.
Click Sketch on the Sketch toolbar to get out of Sketch.
The settings for extrusion appeared in PropertyManager in the left pane.
In PropertyManager, under Direction 1:
Select End Condition Blind ins.
Do not forget to save


