Fixed Relative Datum Planes Unigraphics Design

fixed datum
In operating Unigraphics software, we first need to understand the basics of the Unigraphics menus. After understanding its functions and uses, it will make it easier for us to make 3d images as desired. Now we try to discuss the Datum at Unigraphics. With this datum, we can use it as a tool field in creating feature features such as cylinders, cones, spheres, rotating solid objects. Apart from that the datum plane can also create features at an angle other than the usual for the target solids surface. we can create two types of datum fields: relative and fixed. Types of datum planes that are commonly used: 
-Relative Datum Planes.
Datum Planes are made relative to other objects in our model. we can use curves, faces, edges, points, and other references as object references to the Datum Planes. There are various methods we can use to create Datum Planes. we can create Datum Planes in relatively few agencies. 
-Fixed Data Plane.
relative datum plane
 Fixed Datum Planes do not include and are not limited by other geometric objects, unless used in a user defined feature. we can use one method for Relative Datum Planes Fixed Datum Planes are created by deselecting the Associative Plane Datum dialog. There is also a special method that can be used to create fixed reference Datum Planes based on WCS and Absolute coordinate systems and by using coefficients in equations. We have to often practice using the features in drawing so that we can memorize what we have to do.

Comments Off

Swept Cut Profile Path Guide Curve Solidworks

· Posted in , , ,

Swept Cut Solidworks
Swept Cut is a toolbar that functions to cut solid objects by adding a sketch aid as a rail or reference.
Sweep creates a base, boss, cut, or surface by moving a profile (section) along a path. A sweep can be simple or complex.
Swept Cut is a command in the Solidworks application that is used to cut 3D objects by sweeping the object (profile) against the path or sweep path that passes through it.
A Swept Cut needs a:
-Profile
-Path
-Guide curve
This Swept Cut command is the opposite command from Swept Boss / Base.
In the Solidworks application there are several commands that are used to convert 2D objects into 3D objects including
namely Extrude Boss / Base, Revolve Boss / Base and Swept Boss / Base commands.
The three commands have the opposite command or commands that have opposite functions, namely Extrude Cut, Revolve Cut and Swept Cut.
How to use the Swept Cut command.
The Swept Cut command is the opposite of the Swept Boss / Base command.
Its function is to cut 3D objects using a profile (object) that was swept across the specified path.
Swept Cut Command Location
We can find the Swept Cut command from the Command Manager or from the Menu Bar.
From Command Manager: Features> Swept Cut
From the Menu Bar: Insert> Cut> Sweep
We can't click the Swept Cut command while the sketch is active, so we must first exit the sketch before calling this command.
Select Profile and Path
After we click the Swept Cut command, a dialog box will appear on the left side of the work screen.
Look for the Profile and path fields.
Click the Profile field, then click the object to be sweep.
After that, click the Path field, then click the object that will be used as the Sweep path.
To end the Swept Cut process, click OK.

Comments Off

TEXT MTEXT LEADER QLEADER in AutoCAD

· Posted in , , ,

TEXT MTEXT LEADER QLEADER in AutoCAD
Dimension Text Edit is one of the commands in the autoCAD program that functions to change, copy, delete, modify text or dimensions both in the form of displacement, rotation and angle.
By using the Dimension text facility, edit or modify this dimension text. We can change the text in the dimensions that we make according to our wishes. Although text is created with the TEXT, MTEXT, LEADER, or QLEADER menu, it can be modified like an object from any other object.
We can also change the text properties from the Properties palette. we can also edit the contents of the text that has been created. Double click the text we want to edit. The Edit Text dialog box will appear for single line text, and a Multiline Text Editor will display for multiline text.
In editing text, we can also select the text type, right click and click Properties on the shortcut menu, then edit the text in the Properties palette.
Order of steps in editing text:
From the Modify menu on the autocad toolbar, select Object.
select Text. then select Edit.
select the text that we want to edit.
In the Text dialog box, type new text. then select OK.
Select any other text that you would like to edit, or press ENTER to end the process.
The difference between TEXT and MTEXT
Although they have the same function, which is both for creating text, TEXT and MTEXT have somewhat striking differences. Namely on TEXT it will produce writing with only one line, meaning that even though when writing with TEXT you make many lines at once, the result will still be one object per line. While on MTEXT it will produce writing with as many lines as you want, so the writing that you have made in lines will result in one object only.


Comments Off

Learn to make Solid Object modeling using the Loft solidworks method

Solid Object Modeling using the Loft method.
Example: Making a solid cylinder with R = 50 mm and a length of 200 mm.
1. Click the New icon, part icon, to create a new part.
2. Click the front icon, and the 2D sketch icon, so that we can activate the sketch tool.
3. Click the circle icon, and then from the origin we create a circle with R = 50 mm
4. Click the 2D sketch icon so that the sketch tool is inactive.
5. Click the isometric icon so that we get the circle sketch image in the isometric projection.
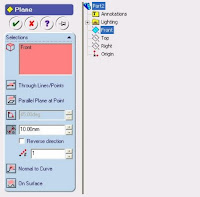
6. On the menu bar line, Click Insert, Reference Geometry, Plane. So that the Plane dialog box will be active as follows:


8. From the Plane box above, we click the plane, so that the right side will activate the Feature Manager Design Tree (FMDT). In FMDT, we click front
So that in the Selection section there will be Front text. After that, type 2000 mm and check the Reverse direction box.
9.Click the plane1 icon and the 2D sketch icon so that we can activate the sketch tool.
10.Click the circle icon, and then from the origin create a circle with R = 50 mm.
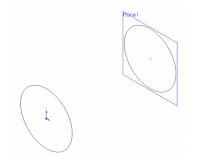
11. Then click 2D sketch so that the sketch tool is inactive. So that we get an image like the following:


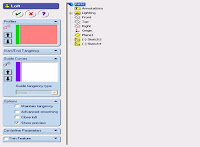
12. Click the loft icon or on the menu bar click Insert, base, Loft. so that the Loft dialog box will be 
active as follows:


13. From the Loft dialog box above, click loft so that the right side will activate the Feature Manager Design Tree (FMDT). On FMDT click 3 and sketch 4, so that both sketches will be read in the group profile.
14. After the above process is complete, click the checklist so that we get a solid cylinder from the loft 
method.


Comments Off

Using Parametrics in Sketches Solidworks Tutorials

Sketching in SOLIDWORKS is the basis for creating features. Features are the basis for creating parts, which can be put together into assemblies. Sketch entities can also be added to drawings. What separates parametric CAD tools from simple 2D drawing programs is the intelligence that you can build in to a parametric sketch. In this tutorial, you learn some of the power that parametrics can provide in both structured using actual dimensions and unstructured changes. 1. Open a new SolidWorks document by clicking the New toolbar button or by choosing File, New. 2. From the list of templates, select a new part template, either inch or millimeter. 3. Press the Spacebar on the keyboard to open the View Orientation dialog box, and double click the Front view. 4. Right-click the Front plane in the FeatureManager, or whatever the first plane listed is, and select Sketch. 5. Click the View menu, and make sure the Sketch Relations item is depressed. This shows small icons on the screen to indicate when parametric relations are created between sketch entities. 6. Click the Circle from the Sketch toolbar, choose Tools, Sketch Entities, Circle. 7. Sketch a circle centered on the Origin. With the Circle tool activated, click the cursor at the Origin in the graphics area. The Origin is the asterisk at the intersection of the long vertical red arrow and the short horizontal red arrow. After clicking the first point, which represents the center of the circle, move the cursor away from the Origin, and click again, which will establish the radius of the circle.  8. Deactivate the circle by clicking its toolbar icon or pressing the Esc key on the keyboard. Now click and hold the cursor on the circle, then drag it to change the size of the circle. The center of the circle is locked to the Origin as the Coincident icon near the Origin appears. The radius is undefined, so it can be dragged by the cursor. If the centerpoint were not defined, the location of the center of the circle could also be dragged.

Comments Off

Customizing Toolbars Unigraphics Utility NX

The display of the toolbars as well as the display of each element within a toolbar may be customized. The display of a toolbar may be controlled in one of two ways: 
-Choose Tools→Customize from the main menu bar to access the Customize dialog. On the Toolbars page, choose the check box next to the toolbar name to display or hide it. The toolbars with a check are currently displayed. 
-Use the Third Mouse Button (MB3) within the NX window but outside the graphics window, to display a menu of all toolbars. The toolbars listed with a check box are displayed. Choosing a toolbar name with the First Mouse Button (MB1) will turn it on or off. The Customize option may be selected to access the Customize dialog 
-To turn on and off the display of icons within a toolbar, select the Toolbar Options area of the toolbar and choose Add or Remove Buttons, and the toolbar name. This will display a cascading menu with all of the available icons for the toolbar. Placing a check in the box next to the command will immediately display the icon in the appropriate toolbar. Removing the check will hide the icon.

Comments Off

Shortcut Keys Anchor Dockable Windows AutoCAD

The palette edge is the docking anchor. Once snapped together, you can drag all of them at once, provided you grab the palette at top left. The ability to anchor dockable windows is one of the best new features in AutoCAD. In case you haven’t noticed, there has been a proliferation of dockable windows in recent AutoCAD releases. These include the following: a Advanced Settings Dialog Command Line, Dashboard, dbConnect Manager, Design Center, External References, Info Palette, Lights In Model, Materials, Markup Set Manager, Properties, Quick Calculator, Sheet Set Manager, Sun Properties, Tool Palettes, Visual Style Manager. With all these dockable windows competing for space on screen, there is now officially no room left for drawing. Autodesk probably figured that it couldn’t just tell everyone to go out and buy three more monitors, so it invented the anchor feature. Right-click the vertical title bar of any palette (or, more correctly, dockable window), and toggle on Allow Docking, if it’s not already on. Repeat, and choose Anchor Left or Anchor Right. The best thing about anchoring is that you can anchor multiple dockable windows on each side of the screen without sacrificing any more pixels. Hover the mouse over any labeled anchored dock, and the associated palettes expand, filling all the available space. Anchoring is the most efficient way to work with dockable windows. Try anchoring as many palettes on the edges of the screen as your display resolution allows. You’ll have instant access to most of the UI without having to hunt for palettes in the menu or, worse yet, try to remember shortcut keys.

Comments Off

Sketching Dimensioning and Creating a Hole

Sketching a Hole
Create a circle for the center hole
Click Extruded Cut on the Features toolbar
Select the top face of the part
Click Top on the Standard Views toolbar
Click Circle on the Sketch toolbar
Move the pointer over the origin.The pointer changes to
Click to place the center of the circle
Move the pointer to create the circle.
Click to finish the circle and click OK in the PropertyManager

Dimensioning the Hole Sketch
Click Smart Dimension on the Sketch toolbar
Select the circle.3.Move the pointer and click to place the dimension
In the Modify box, type 25, then click OK and click in the graphics area

Creating a Hole
click exit sketch
click trimetric
in the propertymanager, under direction1, select through all for end condition
click OK.

Comments Off

Toolbars and commands Solidworks Desktop

· Posted in , , , , ,

When we open a new Part document you get additional toolbars and pull-down menus. Toolbars and commands are context sensitive. The commands that are available and related to what the user is doing are in color and the commands that are not available are shown gray. A new toolbar is the View Heads Up toolbar, at the top-center of the Graphics Area . It can be customized, as we shall see later. The question mark at the lower-right corner can be clicked to get help. SolidWorks Desktop for a New Part Document 1.SolidWorks logo 2.Main Drop-down Menu 3.Quick Access Toolbar 4.File name 5.SolidWorks search 6.Help  & Minimize/Maximize/Close window 7.CommandManager 8.CommandManager toolbars tabs 9. Feature/Property/Configuration managers tabs 10.File name  11.FeatureManager Design Tree  12.Origin  13.View Heads-Up toolbar  14.Minimize/Maximize/ Close window  15.Task pane  16.SolidWorks command description 17. Reference triad 18.SolidWorks status bar & units selection 19.Quick tips  20.Graphic.

Comments Off

Learning to Use Sketch Relations 3D Solidworks

· Posted in , , ,

While it is useful to read through the definitions and functions of all the sketch entities, tools, and relations, using your mouse to create is what this is all about. This tutorial makes sure that you get to know all the major functions in SolidWorks sketches. Almost every part that you build will start with a sketch, so this is a skill worth mastering. Follow these steps to learn about sketch relations: Open a new part using a template that you set up in the Template tutorial from Chapter 1. If you do not have this template, there is one provided for you on the CD-ROM named BibleInchTemplate.prtdot. Copy it to your templates folder and use it to create a new part. You may also use a SolidWorks default template. Select the Front plane in the FeatureManager, and click the Sketch button on the Sketch toolbar. Click the Line tool from the Sketch toolbar. Move the cursor near the Origin; the yellow Coincident symbol appears. Draw a line horizontal from the Origin. Remember that there are two ways to sketch the line: Click+click or click and drag. Make sure that the line snaps to the horizontal and that there is a yellow Horizontal relation symbol. The PropertyManager for the line should show that the line has a Horizontal relation. Also notice that the line is black, but the free endpoint is blue (after you hit Esc twice to clear the tool, then clear the selection). This means that the line is fully defined except for its length. You can test this by dragging the blue endpoint. Click the Smart Dimension tool on the Sketch toolbar, use it to click the line that you just drew, and place the dimension. If you are prompted for a dimension, type 1.000. If not, then double-click the dimension; the Modify dialog box appears, enabling you to change the dimension. The setting to prompt for a dimension is found at Tools ➪ Options ➪ General, Input Dimension Value. Draw two more lines to create a right triangle to look like Figure 3.40. If the sketch relations symbols do not show in the display, turn them on by clicking View ➪ Sketch Relations. You may want to set up a hotkey for this, because having sketch relations is useful, but often gets in the way. Note that the sketch relation symbols may also be green, depending on how your software is installed. Drag the blue endpoint of the triangle. Dragging endpoints is the most direct way to change the geometry. Dragging the line directly may also work, but this sometimes produces odd results. The sketch leaves a ghost when dragging so that you can see where you started. Note that the setting for leaving a ghost when dragging a sketch is found at Tools, Options, Sketch, Ghost Image On Drag. Click the Smart Dimension tool, and then click the horizontal line and the angled line. This produces an angle dimension. Place the angle dimension and give it a value of 30°. Click the Sketch Fillet tool, set the radius value to 0.10 inches, and click each of the three endpoints. Where the 1.000-inch dimension connects to the sketch, SolidWorks has created virtual sharps. Figure 3.41 shows the sketch at this point. You may now want to turn off the Sketch Relations display because the screen is getting pretty busy. You can find this setting at View >Sketch Relations.

Comments Off

Creating a Custom Arrowhead in AutoCAD

Click Modify. In the Dimension Style Manager, Symbols and Arrows tab, under Arrowheads, select User Arrow from the First arrowhead list. In the Select Custom Arrow Block dialog box, enter the name of the block that you want to use as an arrowhead. Click OK. There aren’t many things you can do to make your dimensions look different from those of every other AutoCAD user, but you can create a custom arrowhead. I personally like the traditional open arrowhead that I used when drawing by hand. In AutoCAD, I reproduce that venerable shape with a line segment and two large radius arcs. If you’re as nostalgic as I am for the arrowheads of yore, do this: 1. On layer 0, draw an arrowhead one unit long and pointing to the right. 2. Define a block with the arrowhead you just drew, using the arrow point as the inser- tion point. 3. Select User Arrow from the bottom of the First list in the Arrowheads section of the Symbols And Arrows tab of the Modify Dimension Style dialog box. 4. Select your arrowhead block by name. If you want to use your custom arrowhead for leaders, you have to specify that by selecting it from the list of possible arrowheads in the Leader pane of the Symbols and Arrows tab.

Comments Off

Make 3D Solid Objects with the Sweep method

· Posted in , ,

Make solid cylinders with R 50 mm long and 200 mm long. Creating a new part, Getting to know the sweep method, Getting to know the Sweep dialog box  1. Click the New icon and part icon to create a new part 2. Click the icon, and the 2D sketch icon so we can sketch tools activate. 3. Click the circle icon, and then from the origin create a circle with R = 50 mm. 4. Click the 2D sketch icon so that the sketch tool is inactive. 5.Click on the icon and click on the 2D sketch icon so we can sketch tools reactivate. 6. Click the normal top icon and then click the full line icon, then from origin draw a vertical line upwards of 200 mm. 7. Click the 2D sketch icon so that the sketch tool is inactive back. 8. Click the isometry icon.  9. Click the Sweep icon or on the menu line click insert, base sweep. So the sweep dialog box will be active. 10. From the sweep dialog box above, we click so right will be active Feature Manager Design Tree (FMDT). On FMDT, we click sketch 1 and sketch 2 so that both sketches are read in the group profile and path. Note: Sketch 1 is a sketch for a circle with R 50 mm (functions as profile), and sketch 2 is a sketch for a 200 mm full line (functions as a path). 11. Finally click the check list, so we will get a solid cylinder of the results sweep process.

Comments Off

Solid Object Modeling with the Revolve method

Solid Object Modeling with the Revolve method Problem: Make solid cylinders with R = 50mm and length of 200mm. Target, Make a new part, Get to know the Revolve method, Get to know the Revolve dialog box 1. Click the New icon and part icon to create a new part 2. Click the icon, and the 2D sketch icon so we can sketch tools activate. 3. Click the centerline icon and then from the origin create the centerline line horizontally to the right 200mm. 4. Then click the full line icon and then from the origin make the line vertical upwards of 50 mm then horizontal to 200 mm and vertical down 50 mm so we get a picture like the following: 5. Click the Revolve icon, or on the menu line click insert, base, revolve, so the revolve dialog box will appear as follows. 6. From the revolve dialog box above, in the Revolve section we select the parameter One-Direction and type 360 ​​deg. 7. After the above process is complete, click the checklist so that we will

Comments Off

The Pattern feature in the Solidworks program is very easy to apply

· Posted in , , ,

To build a sketch driven pattern: Open a sketch on the face of a part. Click Point or Tools > Sketch Entity > Point , and add multiple sketch points to represent the pattern you want to create, based on the seed feature. Click Sketch Driven Pattern (Features toolbar) or Insert > Pattern/Mirror > Sketch Driven Pattern. Patterns make items by repeating selected objects in an array based on the features we want. Many supporting features exist in the Solidworks program. We can make a variety of patterns ranging from linear patterns, circular patterns, curve patterns, fill patterns or using point sketches or coordinate tables to create patterns. To reproduce features in Solidworks select the Visual Properties option in the Property Manager. For Circular Pattern, select the feature and axis as the center of rotation, then specify: The number of items and the angular distance or number of items and the total angle to create the pattern. For Curve Driven Pattern, select a feature and segment or sketch where for the feature's pattern. Then we can determine the type of curve, the curve method, and the alignment method. For patterns, choose where to change the seed feature by sketching points on the face model. For Table Pattern, add or take the previous item with XY coordinates to fill in the feature. For Fill Patern, fill in the area specified with the pattern feature. We can also make copies of patterns and copies of patterns of control and adjustment systems.

Comments Off

Export autocad dwg files to unigraphics

· Posted in , , ,

To export autocad dwg files to unigraphics is very easy We can do autocad drawings with the help to facilitate and speed up our design. Use the DXF/DWG translator, if you want 2D drawing and 3D geometry in the DXF/DWG file (Export as 3D option). Use the 2D Exchange translator to generate DXF/DWG output in the following cases (Export as 2D option): - If you want to export a single drawing to the model space of AutoCAD. - If you want to export only 2D drawings and no 3D geometry. - If you want to export single model view of assembly or part. This import command allows us to choose the type of geometric constraints that apply automatically to our sketches. NX geometry analysis in the active sketch will implement the selected boundary.

Comments Off

Features combine substract in Solidworks


In the Solidworks program we can combine the bodies contained in one multibody section. We will not be able to combine two separate parts, not touching.
We can create a multibody section by using Insert Section to place one section in another section file.
Then we can only use Combine on multibody parts.
To use the Subtract combine in Solidworks
Click Combine the Features toolbar, or click Insert, Features, Combine.
Combine PropertyManager will appear.
In the Operation Type, click Subtract.
In the Main Body, select the body that will be maintained as the main body.
For Main Body, select the body to keep. ...
For Bodies to Subtract, select the bodies whose material you want to remove.
or select a body of solid body design FeatureManager folder tree.
Under the body to Subtract, select the bodies which we want to remove for Solid Bodies.
Click Show Preview to see the feature.
if it is appropriate ..... Click OK.
good luck 


Comments Off

Create a Polar Array with AutoCAD

· Posted in , ,

How to make a Polar Array?
Click Home tab Modify panel Polar Array. Find.
Select the objects to array.
Specify a center point. A preview array is displayed.
Enter i (Items) and enter the number of objects to array.
Enter a (Angle) and enter the angle to fill. You can also drag the arrow grips to adjust the fill angle.
In making the polar array, we can make with counterclockwise or clockwise, depending on whether we will enter positive or negative value for sudutnya.Jari-finger array is determined by the distance from a particular focal point for the reference or base point on the last selected object. We can use a standard reference point (usually an arbitrary point which coincides with the point snap), or we can determine the new base point which will be used as a reference point. Array Size Limit If we determine a very large number of rows and columns to arrays, AutoCAD may take a long time to make copy.in default, the number of array elements that can be generated by a limited command is controlled by setting 100.000.MaxArray in registri.we can change boundary by assigning variables using the recording system MaxArray (setenv "MaxArray" "n") where n is the number between 100 and 10,000,000 (ten million).

Comments Off

Three section planes Solid surface models

You can use view 3d product solidworks with the section plane. You can create a section view, if you made design 3d, click shaded, click view isometric, Click on the section view in the Drawing toolbar, or click Insert, Drawing View, Section. You can use up to three section planes at once. Solid and surface models as well as assemblies can be sectioned. You can use the spin boxes, enter numbers manually, or drag the arrows that are attached to the section planes to move the section through the model. Section planes can also be rotated by dragging the border of the plane. To create the look of a multi-line, or using the line the middle as the line sections, sketch the line before clicking the tool Section View. Some of the lines can have the same label. If the line does not fully penetrate the bounding box of model in view, we are asked whether we want this to be partial cut. If you click Yes, See Section made as part of partial view.

Comments Off

Creating Simple Parts Assemblies and Drawings

Extruding from a selection.
The From panel establishes where the Extrude feature starts. By default, SolidWorks extrudes from the sketch plane. Other available options include: l Surface/Face/Plane. The extrude begins from a surface body, a face of a solid, or a reference plane. Extruding from a surface Cross-Reference Surface features are discussed in detail in Chapter 27. n l Vertex. The distance from the sketch plane to the selected vertex is treated as an offset distance. l Offset. You can enter an explicit offset distance, and you can change the direction of the offset. Direction 1 and Direction 2 Direction 1 and Direction 2 are always opposite one another. Direction 2 becomes inactive if you select Mid Plane for the end condition of Direction 1. The arrows that display in the graphics window show a single arrow for Direction 1 and a double arrow for Direction 2. For the Blind end condition, which is described next, dragging the arrows determines the distance of the extrude. Each of the end conditions is affected by the Reverse Direction toggle. This toggle simply changes the default direction by 180 degrees. You need to be careful when using this feature, particularly when using the Up to end conditions, because if the entity that you are extruding up to is not in the selected direction, an error results. Following is a brief description of each of the available end conditions for the Extrude feature: l Blind. Blind in this case means an explicit distance. The term is usually used in conjunction with holes of a specific depth, although here it is associated with a boss rather than a hole. l Up to Vertex. In effect, Up to Vertex works just like the Blind end condition, except that the distance is parametrically controlled by a model vertex or sketch point.
SolidWorks 2010
Bible
Matt Lombard
Published by
Wiley Publishing, Inc.
10475 Crosspoint Boulevard
Indianapolis, IN 46256
www.wiley.com

Comments Off

AutoCAD Using Polar Tracking and PolarSnap

Because everything that you create requires some degree of precision, it is critical that you learn the different options for creating geometry accurately and yet efficiently. Previously, you learned how to enter coordinate data in the form of absolute and relative coordinates. These methods, though important, are not always the most efficient for creating geometry. Using polar tracking and PolarSnap, you can create geometry with the same precision as coordinate entry allows you, but more efficiently. To use these features, you need to adjust their options and turn them on using the status bar buttons. In the following illustration, the same paths are being drawn using polar tracking and PolarSnap. The alignment paths appear as dotted lines extended indefinitely from the point of your cursor. The polar tooltips display the current position of the cursor relative to the last point selected. The path on the left is using polar tracking with an absolute angle measurement, while the path on the right is using the Relative to Last Segment option. 
Autodesk Official Training Guide
Essentials
Published by:
Autodesk, Inc.
111 Mclnnis Parkway
San Rafael, CA 94903, USA

Comments Off
Powered by Blogger.