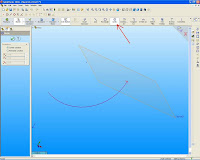
The first step we have to do is click on the toolbar Plane Geometry references, or click Insert, Reference Geometry, Plane.
The PropertyManager Plane will appear.
In the selection, select the type of plane that we want to create and the items to make a plane:
For the Normal Curve.
Create a plane through point and perpendicular to the edge or curve.
Select the edges or curves, and dots.
Select Set the origin on the curve of a check box to the place of origin on the curve, the default is to place the origin point
We only select the curve to create a new plane.
Plane perpendicular to the end of the curve.
The selected items will appear in the Reference Entities box. A preview of the new plane appears in the graph area.
Click OK to create the plane.
new plane appears in the graphics area and te
rdaftar in FeatureManager design tree.
To cancel the transaction, click cancel.
To create a plane, click save in PropertyManager Plane will be displayed.
AutoCAD 2012
Now we will learn autocad by trying to use the latest version of AutoCAD 2012
The first step we must do in order to use AutoCAD 2012 is the software to install via CD-ROM.
If we are not used to install AutoCAD, we can ask for help from someone familiar with the computer system.
For those who want to try to install itself, steps should be taken to install AutoCAD 2012 is:
1. Run AutoCAD Installation Wizard (SETUP.EXE) from the CD or the hard drive
2. Choose the language bahasa (language) used to install and click Install Product
3. In the Select the Product to Install, checklists Autodesk Autocad 2012 and 2012 Material Library and then click Next
4. At the License Agreement, Select I Accept and click Next
5. In the User and Product Information, the contents of the required data and fill in the serial number and product key / keygen, then click Next.
6. On the Begin Installation, click Install, and when asked whether to use the default configuration / settings,
click yes. Because by default, will install AutoCad for personal computers.
7. Wait until the program finished installing AutoCad.
8. Click Finish.
AutoCAD has finished installed on the computer.
If we use the activation code crack for Autocad how to extract the crack in the CD to the AutoCad program file that is installed in C: \ Program Files \ Autodesk \ AutoCAD 2012 - Home
By default, AutoCAD put a shortcut on the desktop. We can double-click this shortcut to launch AutoCAD or it can from the start> Programs> Autodesk> AutoCAD 2012> AutoCAD 2012.
Creating a New Image
Once we install the AutoCAD program, will automatically open a new image / blank with the name Drawing1.dwg.
AutoCAD 2012 offers lots of workspace including drafting & Annotation, 3D basics, 3D modeling, Autocad Classic.
When we first opened autocad default screen will appear. If we are going to work in 2D in AutoCAD,
steps we have to do is:
1. Switching from the Workspace menu pop-up window, select the 2D Drafting & Annotation. This shows
ribbon with 2D commands.
2. Select Button Application> New. From the Select Template dialog box, select acad.dwt and
click Open. This puts you in a 2D display on and off the grid.
Comments Off
STARTING UNIGRAPHICS
Unigraphics interface using a toolbar that can be customized for each user. Various options are located below the Menu bar and a variety of cascades can accessed by selecting the appropriate icon from the toolbar. For emphasis "ease of use". Here we will start from the beginning by introducing the functions and identify locations with respect to the toolbar and icons. Session Unigraphics has "out of the, box" interface, so that Gateway applications and modeling will be adjusted through an activity.
Toolbar control the display can be accessed from any of the 3 steps:
• Select Tools-> Customize from the main menu.
• Select View Toolbars from the menu min.
• Use the third mouse button in the window Unigraphics, outside
Graphics window.
Views of each toolbar, and every element of each toolbar, the user
adjusted. To turn ON or OFF display the toolbar select
Tools -> Customize or click MB 3 in the toolbar area and select Customize.
Placing a check in the box beside the name of the toolbar will immediately display
toolbar in the area of graphics.
Comments Off
Create an Arc on SOLIDWORKS
We can create an arc by specifying three points (start, end, and midpoint).
To make a three point arc:
1. Click the 3 Point Arc the Sketch toolbar, or click Tools, Sketch Entity, 3 Point Arc.
Arc appeared PropertyManager
PropertyManager controlling sketch Centerpoint Arc Arc, Tangent Arc, or 3 Point Arc.
Parameters
We can determine the appropriate combination of the following parameters to determine the arc / arcs.
If we change one or more parameters, other parameters are automatically updated.
Center X Coordinate: X Coordinate Center
Center Y Coordinate: Center Y Coordinate
Start the X Coordinate: Starting X coordinate dr
Y Coordinate Start: Start mister Y Coordinates
End X Coordinate: Coordinate X End
End Y Coordinate: End Coordinates Y
Radius, Angle.
Comments Off
Powered by Blogger.


