Unigraphics, Part Navigator

Sketches can be created by selecting a Section Sketch icon in the creation of certain features such as Extrude and Revolve dialog, select the Sketch icon directly on Form Feature toolbar, or by selecting Insert> Sketch.
If we make a sketch of the feature creation dialog, section sketches remain internal to the feature. It does not display in the graphics window or in the Part Navigator. we can edit the sketch to access related features. If the sketch is needed to make additional
feature, you can select Make External Sketch of MB3 popup menu in the Navigator section and will appear in the graphics window.

If the sketch is not created from the feature creation dialog, it will appear as a separate feature in the Navigator section.

Comments Off

Making the Cut Extrude use offset

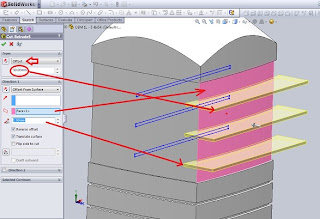
Set the initial conditions to extrude cut feature with offset
As we embark on the plane cut extrude the sketch plane offset from there.
We have to adjust the offset distance and enter into the Offset Value property manager ..
If necessary, click Reverse Direction to extend the features in the opposite direction from that shown in the preview.
Apply one or more features for multibody parts by selecting the Geometry pattern selection, and use the Scope feature to choose the body.
We have to create a model that we want to add a feature to multibody parts before adding the feature.
If we add a new body with a model that intersect with features, body-new body also regenerated to include the feature.
If we add a new body with a model that intersects the features, we need to use the edit feature to edit repel feature, choose a body-body, and add them to the list of the selected body. If we do not add a body to the list of the selected body, they remain intact.
When we first create models with multibody parts, automatic features intersecting process all the relevant sections. Auto-select is faster than all the body because the body only at the beginning of the list and does not regenerate the entire model. If we click on the body and clear Selected Auto-select, we must choose the bodies in the area of ​​graphics that we want to include.


Comments Off

Autocad, Creates mirror an object.

This Menu mirror is very useful to create symmetrical objects because we can quickly draw half the object and then reflects the image the whole objects. we flip the object on the axis, called the mirror line to create a mirror image. To determine the line of the mirror while, we enter two points. we can choose whether to remove or retain the original objects.
Mirroring work in parallel to the plane XY of the current UCS.


To make a mirror object:
1. From the Modify menu, select Mirror.
2. Select the object to the mirror.
3. Specify the first point of mirror line.
4. Specify the second point.
5. Press ENTER to retain the original object, or enter y to delete the object in a mirror.


Comments Off

Solidworks, surface knit.

In the Solidworks facility helps us create a 3D solid, namely surface knit.
Knit Surface tool is used to combine two or more faces or surfaces into one.
Below the surface edge must be adjacent and non-overlapping (overlapping).
The position of the surface does not need to be in the same plane.
Try to choose an adjacent surface.
Click knit solid when the solid surface or solid form.
Select Merge to merge the entities face the same basic geometry.
Choose Gap Control to view or modify the tolerance gap knitting.


To make the surface follow langkah2 knit follows:
Click on the toolbar Surface Surface Knit, or click Insert, Surface, Knit.
In the PropertyManager,
Select the surfaces of adjacent surfaces, non-intersecting
Select faces or surfaces to be in Knit.
Select Try to form solid to create a solid model of a closed surface.
Select Merge to merge the entities face the same basic geometry.
Select the face to knit
Select Control Gap to see some edge gaps as possible, and to view or edit the tolerance limits or gaps.
See Knitting tolerance, make modifications if necessary.
Click OK.


Comments Off
Powered by Blogger.